Function
Table 1 describes the user account management functions on the MM910 web user interface (WebUI).
Item |
Function Description |
|---|---|
MM User Management |
Note:
|
Adding an MM910 User
- Choose Account Management > MM User Management.
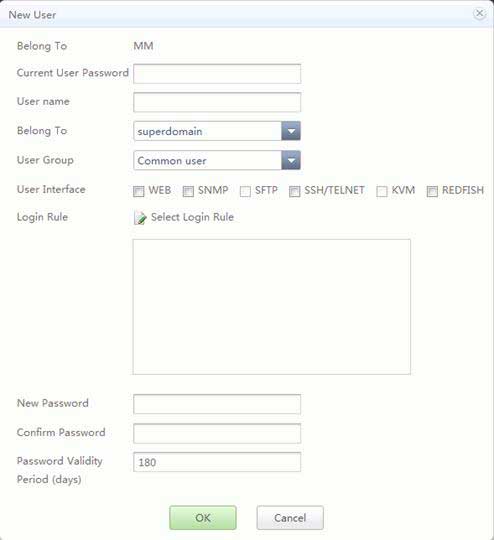
- In the User Management area, click New User.
The New User dialog box is displayed. See Figure 1. Table 2 lists the user parameters.
 NOTE:
NOTE: - To ensure security, it is recommended that you cancel the root user's access permission to all interfaces by deselecting all options of User Interface in Figure 1.
- Administrators without permission to access an interface cannot modify other users' permission to access the interface.
- If all superdomain administrators do not have the permission to access an interface, they can assign the permission to access the interface to other users only by logging in over the serial port and running the userintfauth command. For details about how to log in over the serial port, see Logging In to the Server Over a Serial Port by Using the PuTTY.
Table 2 MM910 user parameters Parameter
Description
Current User Password
Password of the user who has logged in to the MM910 WebUI. You can view the user name in the upper right corner of the page.
NOTE:If an incorrect password is entered for a specified number of times, the current user will be logged out.
User Name
Name of the user to be added.
The user name must meet the following requirements:
- The value cannot exceed 31 characters.
- The following characters are allowed:
- Lowercase letters a to z
- Uppercase letters A to Z
- Digits 0 to 9
- Special characters _-.$
- The user name cannot start with hyphen (-) or dollar sign ($).
- The dollar sign ($) can only be the last character of the user name if used.
Belong To
Domain to which the new user belongs.
The user has the permission to manage the components in the assigned domain. Only the system administrator is authorized to assign a domain for a new user.
User Group
User group to which the new user belongs.
The MM910 supports a maximum of 64 users. The users can be classified into the following user groups by role:
- Administrator: Users in this group can perform all operations.
- Operator: Users in this group can query and set data, but cannot perform advanced operations, such as stateless computing, user management, security management, information collection, and master/slave-chassis management.
- Common user: Users in this group can query information and change their own passwords.
User Interface
Interfaces over which the suer can access the system. The following interfaces are supported:
- WEB: A user can use a web browser to access the system.
- SNMP: A user can access the system over SNMP.
- SFTP: A user can access the system over SFTP.
- SSH/TELNET: A user can access the system over SSH or TELNET. SSH supports IPv4 and IPv6.
- KVM: A user can access the KVM.
- REDFISH: A user can access the system over Redfish.
By default, no interface type is selected.
NOTE:- When SSH/TELNET or SNMP is selected, SFTP is selected by default. If you deselect SFTP, "The function of uploading downloaded files cannot be used" will be displayed.
- You cannot select only SFTP. If you select only SFTP, "Select SSH/TELNET or SNMP" will be displayed.
Login Rule
Rules for user login.
For details, see System Management > System Settings > Security Policy.
NOTE:A user who complies with one of the login rules can log in to the MM910 WebUI or CLI.
New Password
Password of the user to be added.
The password varies depending on whether password complexity check is enabled.
- If password complexity check is disabled, the password must be a string of 8 to 32 characters.
- If password complexity check is enabled, the password must meet the following requirements:
- Contain 8 to 32 characters.
- Contain a space or one of the following special characters:
- `~!@#$%^&*()-_=+\|[{}];:'",<.>/?
- Contain at least two types of the following characters:
- Uppercase letters A to Z
- Lowercase letters a to z
- Digits 0 to 9
- Cannot be the same as the user name or the user name in reverse order.
NOTICE:- The password complexity check is enabled by default.
- For security purposes, do not disable the password complexity check.
Confirm Password
Password entered again for confirmation.
Password Validity Period (days)
Set the password validity period in days. Different users can have different password validity periods.
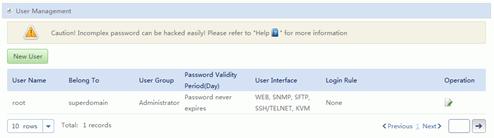
- Click OK.
Figure 2 shows the new users. Table 3 lists the user parameters.


Add a Public Key
- Choose Account Management > MM User Management.
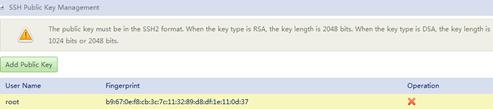
- In the SSH Public Key Management area, click Add Public Key.
The Add Public Key dialog box is displayed, Table 4 describes the parameters.
Table 4 Parameter description Parameter
Description
Current User Password
Enter the password of the user who has logged in to the MM910 WebUI. You can view the user name in the upper right corner of the page.
User Name
Enter the user name.
Public Key
The public key must be in the SSH2 format. The key type is RSA or DSA.
- When the public key type is RSA, the key length is 2048 bits.
- When the public key type is DSA, the key length is 1024 bits or 2048 bits.
Figure 3 shows a configuration example.
NOTE: - The public key of the root user can be added by the root user only.
- The public key can be used to log in to the MM910 only when the user password has not expired.
- Click OK.
Figure 4 shows the new public key. Table 5 lists the public key parameters.