Function
Table 1 describes the user account management functions on the MM910 web user interface (WebUI).
LDAP Configuration
When both the master and slave chassis are installed, you can set the LDAP function on only the chassis to which the function belongs. You cannot set the LDAP function of the slave chassis from the master chassis, and vice versa.
- Choose Accounts Management > LDAP.
Log in to the LDAP server in the sequence of Preferred Domain Server > Alternate Domain Server1 > Alternate Domain Server2 > Alternate Domain Server3 until the login is successful. Each domain server needs to be configured separately.
- In the LDAP Server Configurations area, click Edit.
- Set LDAP parameters.
Table 2 describes the parameters.
Table 2 Parameter description Parameter
Description
LDAP State
- On: indicates that LDAP is enabled. If you select On, you need to set Certificate Verification, Domain Controller Address, LDAP User Domain, and other parameters.
- Off: indicates that LDAP is disabled.
Certificate Verification
Specifies whether to enable certificate verification for the remote LDAP server.
- On: Enable certificate verification.
- Off: Disable certificate verification.
NOTE:You are advised to enable certificate verification for security purposes. When certificate verification is enabled, you need to set the domain controller address to a domain name and import the LDAP root certificate.
Certificate verification level
Specifies the check to be performed on the certificate.
Value:
- Allow: The session proceeds normally even if no certificate is provided or the certificate provided is incorrect.
- Demand: A valid certificate must be provided; otherwise the session is immediately terminated.
Default value: Demand
LDAP Protocol
- LDAP: indicates Lightweight Directory Access Protocol.
- LDAPS: indicates LDAP over SSL, which is a protocol with secure, encrypted transmission.
LDAP Port
Specifies the LDAP server port number, which ranges from 1 to 65535. Each domain server can have an independent port number. The default port number is 389 for LDAP and 636 for LDAPS.
Domain Controller Address
Specifies the IP address or domain name of the AD server.
The domain name can contain a maximum of 255 characters, including digits, letters, and special characters.
User Domain
Specifies the user domain that has been configured in the AD and is used for logging in to the HMM WebUI.
The value can contain a maximum of 255 characters. If the OU name contains the special character backslash (\) or comma (,), the escape character backslash needs to be added to the group domain. For example, if the OU name is "IT\Services,Training" and the domain name is "example.com", specify the group domain as "OU=IT\\Services\,Training,DC=example,DC=com".
- In the Import LDAP Root Certificate area, click Browse next to Upload Certificate, select the existing certificate file, and click Submit.
The certificate file must be ended with .cer, .crt, or .pem in base64 format.
After the certificate file is uploaded, its status and information are displayed. The information contains the user name, issuer name, valid date, and serial number.
- In the LDAP Role Group Configurations area, click Add Role Group.
The Add Role Group dialog box is displayed.
You can configure 1 to 32 role groups. Each role group must be unique.
- Configure the newly added role group.
 NOTE:
NOTE: The configuration applies to both the added role group and the role groups under the group. Up to 20 levels of role groups are supported.
Table 3 describes the parameters.
Table 3 Parameter description Parameter
Description
Current User Password
Enter the password of the user who has logged in to the MM910 WebUI. You can view the user name in the upper right corner of the page.
Group Name
Identifies a group domain in the MM910. You can set a group name as required. The group name is unrelated to the domain controller.
The value can contain a maximum of 32 characters, including digits, letters, and underscores (_).
Group Domain
Specifies the role group domain that has been configured in the AD and is used for logging in to the HMM WebUI.
The value can contain a maximum of 255 characters. If the OU name contains the special character backslash (\) or comma (,), the escape character backslash needs to be added to the group domain. For example, if the OU name is "IT\Services,Training" and the domain name is "example.com", specify the group domain as "OU=IT\\Services\,Training,DC=example,DC=com".
Belong To
Indicates the user domain of a new role group, corresponding to the components of the user domain.
Group Privilege
Specifies the permission level that all users in a group domain have for the MM910.
The permission levels include the following:
- Administrator: Users in this group can perform all operations.
- Operator: Users in this group can query and set data, but cannot perform advanced operations, such as stateless computing, user management, security management, information collection, and master/slave-chassis management.
- Common user: Users in this group can query information and change their own passwords.
Login Rule
Specifies rules for user login.
For details, see System Management > System Settings > Security Policy.
NOTE:A user that meets one of the selected rules can log in to the MM910 WebUI or CLI.
- Click OK.
Figure 1 shows the new role groups. Table 4 lists the role group parameters.
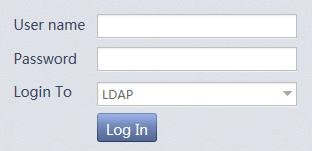
- After LDAP information is correctly configured, you can log in over LDAP. See Figure 2.
The login parameters are described as follows:
- User name: Enter a user name of a user domain of the domain controller. The user name can be an LDAP user name or login user name. The LDAP user name cannot contain comma (,) or back slash (\).
- Password: Enter the password of the user.
- Login To: Select LDAP.